Tutorial: Theming LiteStep
by Paul "BigDaddy" Hale
So you downloaded Litestep? You have downloaded other people themes and wondered,
How in the heck did they do that?! Well I am going to help you understand Litestep
and make a theme. Now I know what your thinking, A theme tutorial? Are you kidding?
No one wants to do a tutorial! Well I was looking at the one that is currently on
shell-shocked in the tutorials section and it is a wee bit out of date.
For this tutorial, I am going to make some assumptions:
- You installed litestep with Omars Installer, and are therefore using the
OTS2 structure.
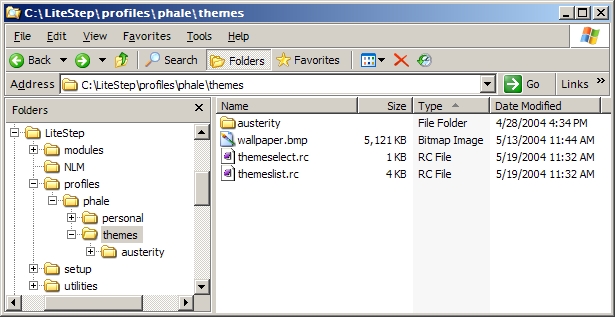
- Your file structure mimics mine:
- In this example, I am using Windows XP, which is NT based. That means that the
Operating System (OS) is set up for multiple users. Windows 2000 & 2003 are also set
up this way. What that means to us is that you have the option of putting your litestep
profile into the C:\Documents and Settings\username directory or in the litestep root
C:\litestep\profiles. (*Note to editor - keep me honest!) [Note to Author: we'll
try, but we can't guarantee anything without an upgrade. - Ed.] I chose to have
mine as you see above, which I believe is the default path. For the duration of this
tutorial I will be in XP.
- You have a basic knowledge of working in windows. Like how to make new folders,
text files and such.
- You have never made a theme before.
- You have an Internet connection.
That should cover it. While it is not necessary, I would also recommend a program
and two sources of support that I find vital to my creation of themes.
- Metapad - All hail the wonderful
text editor that is Metapad. There are bigger text editors, but this is my favorite.
- The Litestep Mailing List -
I love this list. The sense of community and the genuine desire to see people succeed
at using litestep makes this the hub of the LS scene for me. I lurked on this list for
over a year just reading what I thought was ancient Sanskrit before realizing it was
scripting that someone wrote to do something above my head in litestep.
- Forums at Litestep.net - I am willing to
bet most of you have been here already for help. I am here to tell you that you are
going to the right place and to keep it up.
I also want to mention two more applications. The first I use extensively and the
other was recommended.
- The Litestep Control
Panel - This handy little app is so useful I consider it a necessity. You can unload
and reload modules, switch themes, and get a list of all available !bangs for the theme
you are currently using. [Also, see Sunny Saxena's
review of the LS Control
Panel in this issue! - Ed.]
- Litestep Theme Maker 2
(LSTM2) - I personally have not used this application yet, but it is made by the
ls-universe team, & these guys rock in my opinion. Straight from the help file: We're
trying to make themeing much more easier for you. So we decided to create a LiteStep
Theme Editor, which is especially for LiteStep's *.rc and *.box configuration files.
Here Are Two Of The Special Features Of LSTM2: Syntax Colorizing & Automatic Text
Completion. LSTM2 has lots of features to make themeing easier/quicker and now also
has an OTS2 Checking Function, which should catch bigger problems in the theme before release.
Now I am not saying that you need these things above to make a theme. Notepad is
an acceptable editor. But since you are breaking away from the Microsoft way, might
as well go all the way.
OK then, now why do you want to make your own theme? You too good for the themes out
there? You think youre someone special? You are not beautiful and unique as a snowflake.
You are the all dancing, all singing crap of the world. The first rule of litestep is
you do not talk about litestep. The second rule is YOU DO NOT TALK ABOUT LITESTEP
oh wait
a minute
yeah, you can go ahead and talk about it. And you can be beautiful as a snowflake
too if you want.
I know why you want to make a theme. You want to show off your PC and say you did that.
Or you want to work more efficiently on your PC. Or you just dont want to bow down to
Microsoft and use their shell. Whatever your reason, you want to make one and I want to
help. Let me say here and now, if you want to theme litestep because you want attention
at skin sites, or approval from everyone, you will fail. This adage holds true for just
about everything, but I feel is especially important in this case. You may spend months
on a theme and feel that it is the best one ever, but rest assured that someone out there
will hate it. All it takes is one mean or rude review to convince people they are not
good at creating themes and we will lose a themer who has not had time to mature and
create fabulous themes.
The first thing you need to decide on is what kind of theme you are going to make.
Will it be minimal or decked out to the 9s with eye-candy? Will it be a box theme, bar
theme, corner theme, or all driven by hotkeys? It can be any of those. However, since
this is a beginners tutorial, I have decide to make a minimal top-bar theme. I like
top-bar based themes because that is where everything else is. Windows title bars,
min, max, and close buttons, the File-Edit-View-
and so on. This way you are not
all over the screen closing something and opening something else.
The second thing is to decide what modules you need. Since we want this to be
somewhat minimal, we will not be using too many modules. To some people, minimal
means a popup and nothing else. I need more substance. To decide what modules you
need, decide on what you really want to have.
- Desktop - Let me clarify this one. This is what sets the size of you working
environment. Also, your popup wont work without it. It is also a good idea to make this
the first module in your theme.rc. This does not try to emulate the windows native
desktop with icons. I will be using jdesk-0.73 out of personal preference. Hey, it is all
about choice here people.
- Winamp Controls - I cannot function without music playing, so this theme is going
to have Winamp controls. 99.9% of themes have this so people want to learn how to do it. I
will be using dynamp-0.50
- Taskbar - I have to have one. So I need a taskbar module. Normally I cannot tell
the difference between tasks modules, but during the course of making this theme I found that
the only one that does the colors the way I want them is taskbar3-0.303. You will see what I
mean later. I will say one thing however; generally you want to use newer modules. Not always,
but generally. Main reason for this is the bug-fixes.
- System tray - Again, I cannot function without one of these. I like using vtray-1.06.
- Clock - There are so many frigging modules that can display the time it will make your
head spin. I recommend label for this. Or to be more specific, xlabel-2.9. Some people do not
like this module since it is capable of doing so much. I like it for that reason though. I figured
we would use this module since it can replace shortcut2 and a few other things. Also, just in case
there is a tutorial part two ;)
- Popup - Everyone needs this, so we need this. There are a few things you need to know
about your popup before you make your decision on which module you will use. If you are on a W2K
or newer OS, and you do not want/need to use images, you can use menu. If you are on a 9x/ME machine
you must use popup2. Popup2 is the only choice for any Windows OS if you want to skin the
popup. Now, since I am making a minimal theme with no graphics myself and I am on XP, I am going
to use menu-0.82. If you are using a 9x or ME machine, you will have to use popup.
OK, so what have we got so far?
- Jdesk-0.73
- dynamp-0.50
- taskbar3-0.303
- vtray-1.06
- xlabel-2.9
- menu-0.82 (or popup2-2.1.7)
We are already doing things a little different by using xlabel and menu. Here is where it is going to get really interesting: We are going to make it resolution independent down to 640 x 480 and we will not be using any graphics in this theme. That is the main reason for me choosing menu, xlabel, and taskbar3-0.303. These modules allow you, the themer, to use the system colors. That means that we will have an infinite amount of color themes without a single line of scripting! There is only one more thing; we need to load a special module called lsColor-1.6.1. This module assigns an evar to certain system colors. Some modules do not have the ability to automatically use the system colors and this module is a way to work around it.
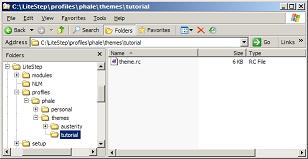
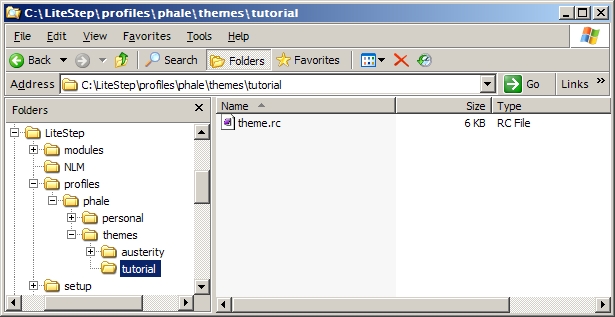
Now go to you your themes dir and make a new folder named tutorial. Open that folder and make a new text file. Rename the text file theme.rc. This will be the file that houses all of our configuration for this theme.
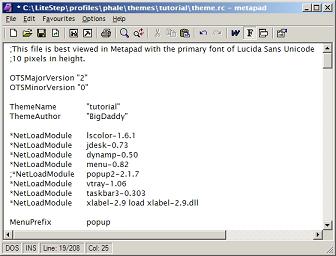
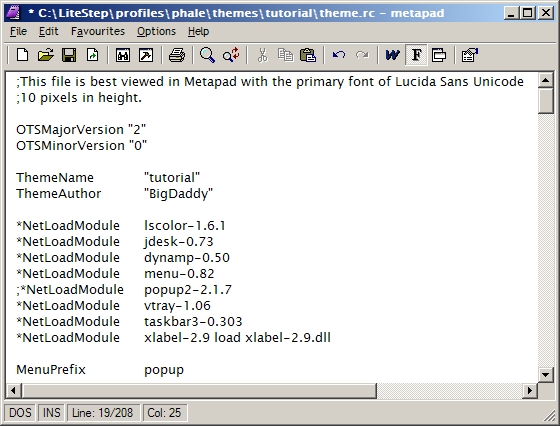
Now open up the theme.rc file with your handy-dandy text editor and lets get started. I personally use Metapad with my primary font set to Lucida Sans Unicode at 10 pixels in height and I always put that in my theme.rc so that the user can view my files exactly as I view them if they wish. Make sure these lines are commented out by placing a semi-colon ; in front of them. Also, I turn off word wrap.
Next we need to tell what OTS version we are making this theme. We do that by placing these lines:
OTSMajorVersion "2"
OTSMinorVersion "0"
Then we enter in the theme name and our name:
ThemeName tutorial
ThemeAuthor BigDaddy
Let me pause here and explain a few things real quick. I have the habit of using the TAB button instead of the spacebar. I like to see my configuration lines in nice neat columns. I also capitalize the beginning of every word so I can recognize them easily. You do not have to do this; it is just one of my quirks. Also, I dont expect you to put BigDaddy as the theme author. That is the name I like to use most often since I became a father, but I occasionally use Marriedman, Madman, or Paul. So you can make up an ultra cool name for yourself or be proud of whom you really are (you beautiful snowflake you) and use your real name.
Now we can put in the NetLoadModule lines. There has been a lot of debate over how you load your modules. Not just the order but also if you thread them. I dont know what that means so I cant help you on that. I do know about the order they need to be in though. Generally your desktop module goes first, but in this case I want lsColor to go first. Reason being, lsColor needs to be loaded before any module you want to use it on. I dont think I will ever use it on jdesk, but it doesnt hurt to put it first. Also, I want to put xlabel last since we will be doing something a little special with it. Special note about xlabel- Since the zip file contains more than just xlabel-2.9.dll we will need to add some extra instructions.
*NetLoadModule lscolor-1.6.1
*NetLoadModule jdesk-0.73
*NetLoadModule dynamp-0.50
*NetLoadModule menu-0.82 (or popup2-2.1.7)
*NetLoadModule vtray-1.06
*NetLoadModule taskbar3-0.303
*NetLoadModule xlabel-2.9 load xlabel-2.9.dll
If you are going to be using Menu, put this line in:
MenuPrefix popup
If you will be using Popup2-2.1.7 you do not have to do anything yet.
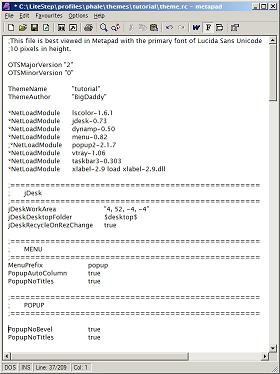
So lets take a look at what we have so far:
Alright! Congratulations! You just made a theme! Thanks for coming to class and enjoying using your new theme.
What? You dont believe me? Go ahead and save the file, then right-click on your desktop, go to litestep on the menu, then to change theme and select refresh list which should be second from the top. Now go back to the change theme menu and you will see tutorial listed there. Select it and you will see your theme. If you dont have the modules I indicated and you are connected to the Internet, you should get the download dialog showing them being installed for you.
Ill grant you that the theme isnt pretty though. The system tray is in the upper left corner in a box and it is covering your taskbar, but you can work from inside the theme now. And you will notice that when you recycle it is fast. Damn fast. Go ahead, check it out, hit CTRL+ALT+R. Thats what a minimal theme is all about. What we are going to do now is make some parameters that the modules must adhere to.
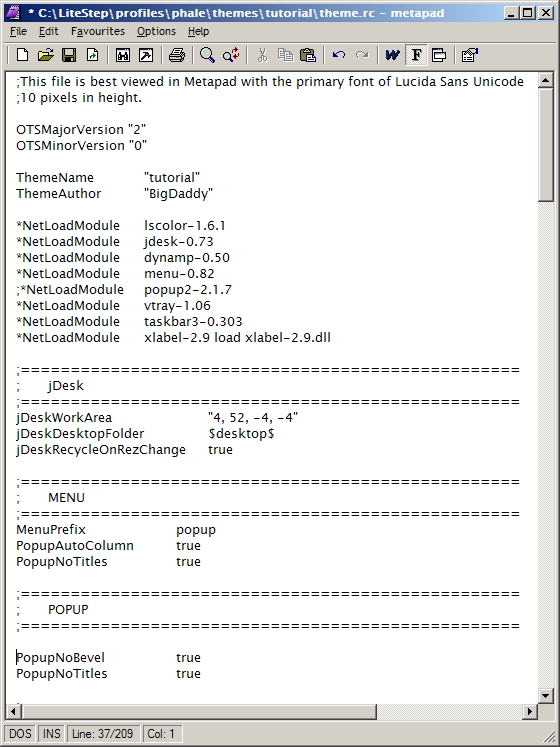
I like to put titles above each new section of the theme.rc. Not only does this make it easy to discern the different sections of the theme.rc file, it also makes it look a lot better in my opinion. If your opinion is different than mine, that is fine. Always remember - opinions are like buttholes. Everyone has them. Yours just happens to stink ;) LsColor does not require any configuration, so lets start with jdesk. Bring up the menu by right-clicking on the desktop and go to litestep>module docs>jdesk-0.73>jdesk.html. This will tell you how to configure jdesk. Lets use 4, 52, -4, -4 for the desktop area, and lets put it above the MenuPrefix line. This is a good time to tell you, in case you do not know, that whenever a module ask for X-Y coordinates, height or width, font size or anything like that, the unit used in a pixel. Not picas or points or centimeters or inches or anything like that. I believe the reason is because that unit of measurement is universal.
Now I know what you are thinking, I am losing too much space! Well, there is something we need to be aware of. The taskbar is only going to be 48 pixels tall but a maximized window will still butt up to it even though the desktop space says 52 pixels. Why is this? Here is the answer according to rabidcow on the LSML.
Window border size.  Maximized windows still have the borders, they're
just shoved out of the work area.  If the theme elements are ontop then
this border goes underneath them and you won't see 'em, which is probably
how explorer gets away with it.
So it's probably not even a constant 4 pixels, but nobody ever changes
their window border width.
-rabidcow
The reason we are using a negative number instead of a normal positive number for the right and bottom is so that the desktop is resolution independent. Very important piece of information. Negative coordinates are what make themes resolution independent. If you are running 800x600 you could have made your desktop 4, 52, 799, 599 (*note to editor - Keep me honest here too) [Darn, this is hard work. - Editor] and it would have worked fine for anyone on the same resolution as you. However, I run 1152 x 864 at work & 1280 x 1024 at home and it would have looked really bad on my screen. Thats why you should make your themes with negative coordinates whenever possible.
It is also possible to support drag and drop onto the desktop with jDesk. The command jDeskDesktopFolder allows it to be any valid folder, but lets just use the standard desktop for it. This will allow you to drag a file onto the desktop and it will copy it there for you. I also want to add jDeskRecycleOnRezChange. Here is what we have now.
jDeskWorkArea "4, 52, -4, -4"
jDeskDesktopFolder $
jDeskRecycleOnRezChange true
Lets go ahead and finish the menu/Popup configuration. Just add:
PopupAutoColumn true
PopupNoTitles true
The first makes the menu create columns instead of scrolling and the second removes the titles from the menu. These are purely done by choice.
If you use a 9x machine or just prefer to use popup, add:
PopupNoBevel true
PopupNoTitles true
Again, this is purely personal taste. The first line there tells popup to remove the bevels between the popup entries. The second line removes the titles from all submenus.
Lets take a look at our theme.rc:
Alright. Go ahead and save your theme.rc file and recycle litestep. Now maximize a window and you can see that a maximized window no longer covers your entire screen. So lets move on to the next module, the taskbar.
So how big does this thing need to be anyways? I said earlier that this is going to be a bar theme that is resolution independent down to 640x480. That will not leave much room for tasks, so we are going to make this sucker have two rows. Kinda like a KDE (a Linux Desktop Environment) taskbar. We are also going to put the Winamp controls and the time label up there too. We might as well put some buttons up there too. So the taskbar needs to be as wide as the monitors resolution from left to right, or resolutionX minus the width of the Winamp controls and time label and the buttons I want to add. Its a little early to tell exactly what that is going to be, but we can ballpark it.
Taskbar Width = ResolutionX - (Time Label Width + System Tray Width + Pauls Buttons.)
That makes sense doesnt it? Instead of trying to do all the math, we could figure this little formula out and have litestep do the work for us. I think I will use the formula if you guys dont mind. Let me state here and now that the above is not an actual configuration, just my thought process. The above formula will NOT work in the theme.rc.
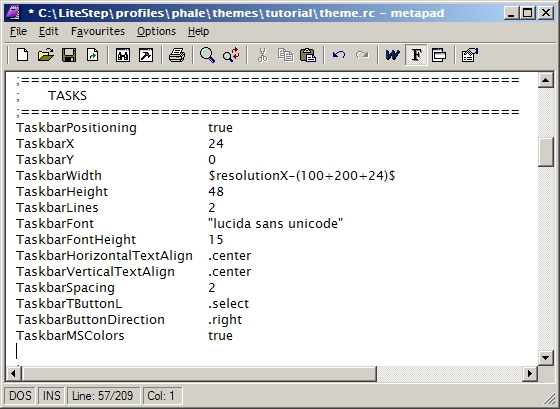
Alright, I think we are ready to configure the taskbar. Bring up the menu and go to litestep>module docs> taskbar3-0.303.txt. We will go down the list and just pull out the lines we need. Since this is going to be a topbar theme, I want the taskbar to start towards the upper left corner, but I also want my buttons over there. Lets move the taskbar to the left 24 pixels. So our X (left/right) coordinate will be 24 and our Y (up/down) will be 0. In order to do this, we need to tell the taskbar it is not going all the way across the screen.
TaskbarPositioning true
TaskbarX 24
TaskbarY 0
I am going to come clean about something. I have already figured out the taskbar width. Whew! Feels good to get that off my chest! The taskbar width will be:
TaskbarWidth -(100+200+24)$
That may sound like a small taskbar, but even on the lowest resolution, you could comfortably fit six tasks in the taskbar.
The height should coincide with the border we established with jdesk previously. Since we know that there is a 4 pixel difference, the taskbar will be 48 pixels tall. This ties into the buttons I will be putting in. They can be two buttons each at 24x24 and they will fit perfect.
Also, I said it was going to be two tasks tall, so that means we need to set TaskbarLines to 2.
TaskbarHeight 48
TaskbarLines 2
Now we are not going to use every single line from the taskbar3 readme, just the ones that we need. And since this is going to be a very minimal theme, we wont need much. Here is the rest of the configuration. These you can understand just by looking at them.
TaskbarFont "lucida sans unicode"
TaskbarFontHeight 15
TaskbarHorizontalTextAlign .center
TaskbarVerticalTextAlign .center
TaskbarSpacing 2
TaskbarTButtonL .select
TaskbarButtonDirection .right
TaskbarMSColors true
You can use whatever font you want of course, as well as the size. The last line there is important though. That tells taskbar3 to use the system colors, which is the whole idea of this theme. OK, lets take a look at what we have for the Taskbar config.

You guys are doing great! Now here is something a little more intimidating. Now I know that as soon as you open the readme for xlabel-2.9 you are going to freak out because it is huge. Just take it slow and you will do just fine. Now remember that we are going to use label for a clock; but it is also going to be able to handle those buttons and our amp controls.
First thing I want to do is lay down anything that is going to be true for all of the labels we are going to be creating. Since we will not be using any graphics and only text will be visible, it is good for the fonts and font height to be consistent. We also want to make sure that the system colors are used. So these will be our first lines of configuration for our labels.
AllLabelsFont "lucida sans unicode"
AllLabelsFontHeight 15
AllLabelsTransparencyMode false
The last line there tells xlabel that we do not want the labels to be transparent. We want the system colors to show. Now lets start making our labels!
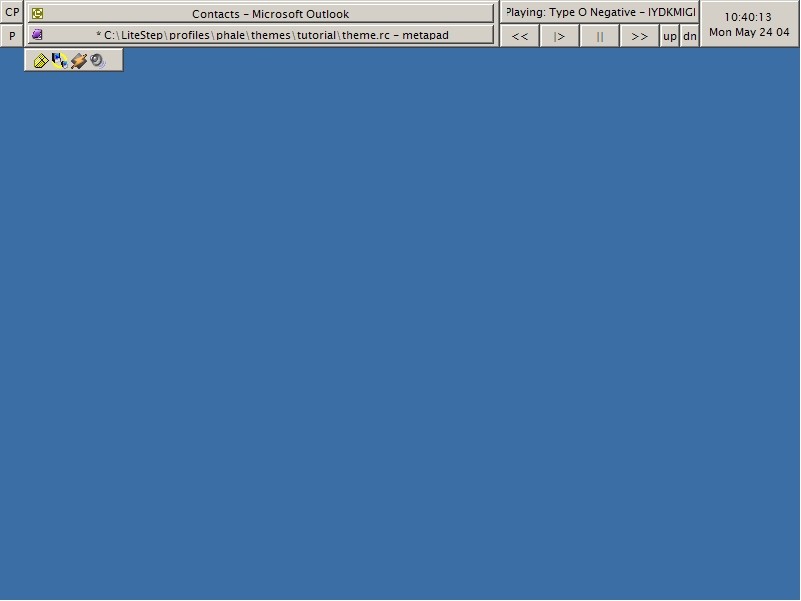
*Label ControlLabel
This names the label ControlLabel so that we can configure labels one at a time. Why did I name it that? This is going to be the button that brings up the Display Properties in Windows, and if you have it - the Litestep Control Panel that is mentioned above. Next we need to position it. We know it is going to be 24 x 24 and we already made room for it before the taskbar. So it is going to be starting at 0, 0.
ControlLabelX 0
ControlLabelY 0
ControlLabelWidth 24
ControlLabelHeight 24
ControlLabelJustify center
ControlLabelText "CP"
ControlLabelTooltip "LSCP/Display"
ControlLabelOnLeftClick !lscp
ControlLabelOnRightClick !Execute [control.exe desk.cpl]
If you did not install the LSCP, then left clicking for it will obviously not do anything. So you can switch the left & right click commands however you wish. If you look at the rest of the configuration, it is really pretty straight forward. I want to center justify any text in this label, the text for this label will be CP, and the tooltip will read LSCP/Display. I have this label set to bring up the Litestep Control Panel when I left click this button or bring up the display properties if I right click. Pretty cool huh?
Now we are going to make an identical button below the one we just made. This one will be a simple menu button. Kinda like the start button. I find it handy to have, but some people prefer to just use a hotkey like the WinKey. We will name this one *Label MenuLabel.
*Label MenuLabel
MenuLabelX 0
MenuLabelY 24
MenuLabelWidth 24
MenuLabelHeight 24
MenuLabelJustify center
MenuLabelText "P"
MenuLabelTooltip "Popup"
MenuLabelOnLeftClick !popup
Lets go over this configuration. We can see that it is all the way against the left side of the screen since the X coordinate is 0. It will start 24 pixels down from the top of the screen. Its dimensions will be exactly the same as the previous label we made, as will the justification of the text (centered). I just put a P for popup as the text, and made the tooltip say Popup. The left click command !popup will, guess what? Make our popup menu appear. The reason for this button is when you have a window maximized; you can still bring up the default popup.
This next label confused the hell out of me the first time I tried it. Im not saying that it is difficult; I'm saying that I was not very computer savvy when I first found Litestep. Also, the readme has come a long way from the time when I was learning it. Go ahead and go to the section on Text Escape Sequences. Scroll down until you come to Valid format for date & time. Just have this open so you can understand what I am going to have in the configuration.
*Label TimeLabel
TimeLabelX -100
TimeLabelY 0
TimeLabelWidth 100
TimeLabelHeight 48
TimeLabelJustify center
TimeLabelText "[time('h:nn:ss')] n[date('ddd mmm d yy')]"
TimeLabelTooltip "Time & Date"
TimeLabelScroll true
TimeLabelScrollInterval 30
TimeLabelScrollSpeed 1
TimeLabelLeftBorder 3
TimeLabelRightBorder 3
TimeLabelOnLeftDoubleClick control.exe timedate.cpl
This tells us that the time label it going to start 100 pixels from the right side of the screen, no matter the resolution. Gotta love those negative coordinates! It is going to butt up to top of the screen and will be as tall as the taskbar. The time format I have chosen is a 12 hour cycle without the 0 leading, minutes, then seconds. The n tells label to create a line break and continue the text string. The string continues as the three letter abbreviation of the current day, three letter abbreviation of the current month, current date minus the 0 leading, then the last two digits of the year. You do not have to use the same format as I, but I would suggest you do for this tutorial.
Okay, bet you are wondering what all that crap is below the tooltip line. Lets just say you decided to use a larger font than I did, or just one that is wider than the one I used. If for some reason the time & date is wider than the label, it will scroll. The last line tells us that if we double click our new time label, it will bring up the time & date applet. The rest should be self explanatory.
Now lets get to the fun part; Winamp controls. I already worked out the size of all the buttons for this, so dont think I made them up and they just happen to fit. I had to fiddle with them until I found the size that I like. Once the theme is done, feel free to change whatever you like. The first thing we need to make for this is a display label. This will show us the information about the music we are playing. So Ill call it MusicInfoLabel. I want it to butt up to the TimeLabel and I want it to be 200 pixels wide. I want it to be half the height of the taskbar and TimeLabel so we have room beneath it for controls. So lets put all that together.
*Label MusicInfoLabel
MusicInfoLabelX -300
MusicInfoLabelY 0
MusicInfoLabelHeight 24
MusicInfoLabelWidth 200
MusicInfoLabelLeftBorder 5
MusicInfoLabelRightBorder 5
MusicInfoLabeljustify center
MusicInfoLabelText "[winampStatus]: [winampSong]"
MusicInfoLabelScroll left
MusicInfoLabelScrollSpeed 2
MusicInfoLabelVertAlign center
Everything there makes sense? It should be pretty straight forward and make sense. The text displayed is from the xlabel readme section under the Text Escape Sequences. Now lets add the !bang commands that make it special. When the mouse enters it, we want xlabel to change the text to show some more info, like the elapsed time and the remaining time. We also want it go back to normal when the mouse leaves the label.
MusicInfoLabelOnEnter !LabelSetText MusicInfoLabel "elapsed [winampTime] / remains [winampRemainTime]"
MusicInfoLabelOnLeave !LabelSetText MusicInfoLabel "[winampStatus]: [winampSong]"
Go ahead and open up the dynamp readme so we can look at the list of !bangs it gives us. Lets make it so that when we double click on it, Winamp will appear. Go ahead but keep that readme open too.
MusicInfoLabelOnLeftDoubleClick !amp_show
Alright, we are making good progress. These next ones will go quick since they are so simple. They will be the amp playback controls. We'll just do these in order, previous, play, pause/stop, next, volume up, & volume down.
*Label PrevLabel
PrevLabelX -300
PrevLabelY 24
PrevLabelHeight 24
PrevLabelWidth 40
PrevLabelText "<<"
PrevLabelTooltip "Prev"
PrevLabelOnLeftClick !amp_prev
This label will be directly below the left edge of the MusicInfoLabel. Since its height and the MusicInfoLabel height combined will equal the taskbar & TimeLabel height, it will all seem like one bar! The Play button is next:
*Label PlayLabel
PlayLabelX -260
PlayLabelY 24
PlayLabelHeight 24
PlayLabelWidth 40
PlayLabelText "|>"
PlayLabelTooltip "Play"
PlayLabelOnLeftClick !amp_play
This will appear directly below the MusicInfoLabel and to the right of the PrevLabel. See how easy this is? Pause/Stop coming up:
*Label PauseLabel
PauseLabelX -220
PauseLabelY 24
PauseLabelHeight 24
PauseLabelWidth 40
PauseLabelText "||"
PauseLabelTooltip "Pause / Stop"
PauseLabelOnLeftClick !amp_pause
PauseLabelOnRightClick !amp_stop
The only thing different about this label is the fact that you have two options, left or right clicking. It is just like our ControlLabel.
*Label NextLabel
NextLabelX -180
NextLabelY 24
NextLabelHeight 24
NextLabelWidth 40
NextLabelText ">>"
NextLabelTooltip "Next"
NextLabelOnLeftClick !amp_next
It just doesnt get any easier than this!
*Label VolumeUpLabel
VolumeUpLabelX -140
VolumeUpLabelY 24
VolumeUpLabelHeight 24
VolumeUpLabelWidth 20
VolumeUpLabelText "up"
VolumeUpLabelTooltip "Volume Up"
VolumeUpLabelOnLeftClick !amp_volumeup
VolumeUpLabelOnWheelUp !amp_volumeup
Okay, I threw in a curve on you guys there. Generally I would say that when you make a theme, you make it for yourself. However, it is still good practice to think, What if someone else were to use this theme? I normally only use the wheel on my mouse to control the volume, but if I distribute a theme, not everyone has a wheel. The last two lines in this configuration covers both bases. The user can either click away on the volume up button or click on it once then roll the wheel up for the same effect. We will also do the same thing for the volume down button.
*Label VolumeDownLabel
VolumeDownLabelX -120
VolumeDownLabelY 24
VolumeDownLabelHeight 24
VolumeDownLabelWidth 20
VolumeDownLabelText "dn"
VolumeDownLabelTooltip "Volume Down"
VolumeDownLabelOnLeftClick !amp_volumedown
VolumeDownLabelOnWheelDown !amp_volumedown
The Winamp controls are finished! You can close the dynamp readme now. This means we are finally at the system tray. I saved this one for last on purpose. It is going to be a little unorthodox, but not so difficult that you will be scratching your head asking, What the hell? Why is it going to be so different? Because no system tray module that I know of can use the system colors. There are a couple of ways we can work around this. If you are on a 9x, ME, or W2K machine, you could just set the vtray background & border color to magic pink (255 0 255). If you are on XP though, the alpha blending of the icons will show as a pink outline to your icons (ugly!). This is why we loaded lsColor. We can set the background & border color to match our system background colors! There is another thing though. If we just have the background & border match the system background colors, it will look flat. The rest of the theme will have the bevels and 3D look to it, so the vtray will stick out. Here is where it gets a little tricky. We are going to hook vtray into a label. This way it will blend in with the rest of our theme. Lets just look at the configuration and talk about it as we go. Well name it the obvious choice, VtrayLabel.
*Label VtrayLabel
VtrayLabelAlwaysOnTop true
VtrayLabelHeight 24
VtrayLabelWidth 24
VtrayLabelX 24
VtrayLabelY 48
VtrayLabelLeftBorder 4
VtrayLabelRightBorder 4
VtrayLabelMoveable
VtrayLabelMoveModifierKey "ctrl"
Okay, everything should be old hat by now, except the last two lines. This configuration gives us a label that is 24 x 24 positioned even with the left side of the taskbar adjacent to the bottom of the taskbar. This is where I want the system tray to be, but as I said before, we need to be cognitive of other users. The second from last line says that this label is moveable and the last line assigns a key modifier that allows us to move it. This way if you or anyone else thinks it is in the way, they can enter the label, press and hold the control key and left click then move the label to wherever they wish.
Now comes the unorthodox part.
*VtrayLabelModuleHook !VtrayHook
This line hooks the vtray to the label we just created. It is like a mini-desktop that only the vtray will be in. Simple enough concept to grasp. Now we configure vtray to go inside this label. Go ahead and open the vtray readme and follow along.
VtrayX 2
VtrayY 2
This says that we want vtray to be two pixels from the left and top corner of the label.
VtrayIconSize 16
VtrayDirection right
VtrayAutoSize true
This states the size of the icons in vtray and what direction to add them as they appear. The last line says that when an icon is added, resize the vtray to accommodate it.
VtrayHeight 18
VtrayWidth 24
The total height of vtray and beginning width.
VtrayBGColor $3dFace$
VtrayBorderColor $3dFace$
Here is where we see the magic of lsColor! If you open your Display properties and go to the Appearance tab-> Advanced to change the colors of the Windows Classic look, you will see 3D Objects. If you use 3DCC, it is called the more appropriate 3D Face. As I said before, lsColor assigns evars to these colors. These two lines use the 3D Face evar to define the background and border color of vtray so that it blends in with our label and doesnt show those ugly pink outlines.
VtrayIconSpacingX 3
VtrayIconSpacingY 0
VtrayBorderLeft 4
VtrayBorderRight 4
VtrayBorderTop 3
VtrayBorderBottom 0
Again, nothing groundbreaking or unusual here. This says that we want a three pixel gap between icons. Since this tray will only have one line of icons, the spacing above or below will be zero. The left and right border just gives us some cushion. The top border helps to center the icons in the label. There are many combinations of configuration that will get you here, so dont think this is the only way. This is just my way.
Now for some tricky configuration.
VtrayOnAdd !LabelGrow VtrayLabel +VtrayIconSpacingX$ 0
VtrayOnDel !LabelShrink VtrayLabel +VtrayIconSpacingX$ 0
These lines are what make the label and vtray stay synchronized. The first line says that when an icon is added to vtray we want VtrayLabel to grow horizontally the icon size (16) and the spacing (3) and not to grow vertically. The second line is the same thing in reverse. When an icon is removed from vtray, shrink the label the icon size and icon spacing.
I bet you are wondering why I didnt just use the number 19? Well, it is good practice for one, plus if you want to alter the gap or icon size, you will not have to update these lines as well.
Guess what? You just finished your first theme. Lets look at it!
So now when someone sees your computer and asks you, What is that? You can reply, Its Shake n Bake, and I helped!
Or you could just tell them it is this great shell called Litestep and start teaching them. I hope you have gained some insight into building a theme, and also gained some confidence in yourself. Now some of the more veteran litesteppers may read this tutorial and think that maybe I should have used xlabel-lite, or shortcut2, or some more orthodox modules for teaching beginners. That may be so, but I really do believe that learning xlabel is more beneficial because it can do so much. If you wanted, you could add desktop icons to this theme. If you wanted, you could add images. Then if you were on a W2K or better machine, you could fades and animations. There is just so much possibility in this theme the way that it was setup. I hope you end up feeling the way that I do about this theme.
*About the author -
I have released a few themes since the little light bulb came on in my head. If you would like to see my credentials, you may view them a few of them here:
http://www.litestep.net/index.php?section=2&action=details&id=461
http://www.litestep.net/index.php?section=2&action=details&id=549
http://www.litestep.net/index.php?section=2&action=details&id=598
*Credits
I would like to thank a few people for their time and effort in testing and proofreading this theme:
Paul Cartwright
Francois Duran
Thierry Tarrason
And of course Ravi & Spark at shell-shocked for their input.